Over the past week, I have experienced a lack of confidence in some of the projects I’ve been working on. I decided to pull myself out of my “self-induced rut” and make a bright bold layout, peppered with positive affirmations, as a reminder to myself that I CAN move forward and get things done.
That’s what girl bosses do!
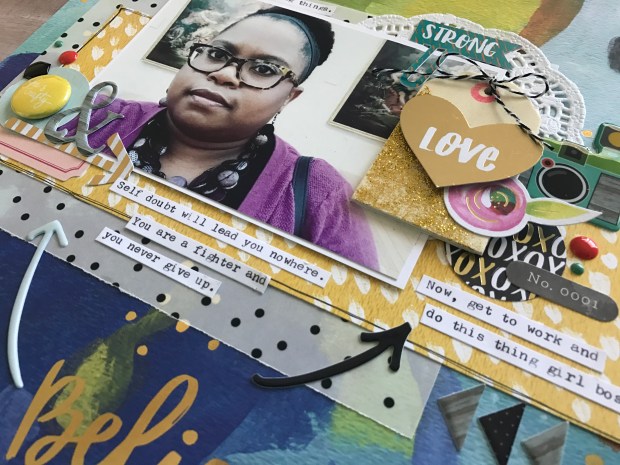
This layout was created using the Jellybean Kit by Clique Kits (April 2017). I began this layout with a stunning painted pattern paper by Bella Blvd called “Believe”. The gold foiled brush script phrase “believe in yourself” serves as the title for this spread. I love when the work is done for me!
I created two bands of pattern paper to anchor my photo and embellishments. The yellow paper is called “Paint Me Pretty”. Under the yellow paper is a piece of black polka dot vellum paper called “Confetti” by Pretty Little Studio. The velum was used to mute the busy background paper just a bit.
Next, I created clusters of embellishments around the photo. Some of the elements on this layout are from my stash – I used most of the embellishments that came in the kit on other projects! That’s a good problem to have. 🙂
To the top right of the photo, I added a doily, a wood veneer tag that I accented with a gold foil heart that says “love”, a small pink flower die cut, and a camera puffy sticker from my stash.
To the bottom left of the photo I create a small cluster to include a yellow flare button that says “She is Crafty”, a die cut arrow, and an ampersand puffy sticker. I added two arrow puffy stickers and enamel shapes by Freckled Fawn to further accent the layout.
Lastly, I typed my journaling strips using my We-R-Memory Keepers Typecast Typewriter…one of my favorite journaling techniques.
Check out the process video for this layout on the Victoria Marie YouTube Channel! And be sure to stop by the Clique Kits website for more information about this kit! Happy scrappin’!
If you are like me, then you probably have thousands of digital photos spread across multiple devices. It is so easy to take photos on our phones and tablets, making the accumulation of photos very easy. However, it is often the case that these photos remain on our devices. And the more photos we take, the harder it becomes to get the motivation to sort, organize, and print them.
Over the years, I have developed a digital photo organization process that has served me well! And yes, I am going to share my awesome tips with you. Let’s get started with setting up an organization flow that will help you work through your digital photos. Remember, this week we are focusing on tackling one set of photos at a time. It is not recommended that you attempt to organize all of your digital photos in one setting, especially if you have thousands to sort and organize. Pace yourself!
THE PROCESS – DIGITAL PHOTO ORGANIZATION
STEP ONE – Start Somewhere! Anywhere!
In this first step, you are going to pick a starting point to begin this process. For example, perhaps you elect to organize your holiday photos or your birthday party photos from last year? Just pick a set of photos and go with it.
STEP TWO – Review Your Photos
Once you have selected a set of photos to organize, you will start the process of reviewing each photo. This should be a relatively quick process where you make swift decisions. For each photo decide if you want to KEEP or TOSS the photo. The photos that you elect to keep should be your very favorite photos. From those photos you can later select which ones you want to SCRAPBOOK. Toss photos that are duplicates, blurry, or photos that you simply do not like. Continue this process until you are satisfied – what remains should be the photos that you truly want to keep.
STEP THREE – Sort and Organize
At this point, you will need to sort and organize your digital photos into categories. Creating digital folders is a very easy way to manage your photos. You can opt to set up folders on your computer, but be sure to back up your photos just in case something happens to your computer (more on this in a few). Decide how you want to organize your photos: by theme, year, month, person, event, holiday, etc.
Create a digital folder for each category and assign your photos to the appropriate folder. Also, set up a folder for photos that you wish to scrapbook in the future. That way when you are ready to create a layout, you have photos designated for scrapbooking. This will save you a lot of time when you are ready to create! NOTE: Your digital photo organization system should be unique to YOUR photo management needs! Do what works best for you.
STEP FOUR – Back Up Your Photos
Once you are done reviewing, sorting, and organizing your digital photos, it is time to back them up! I recommend using 2-3 methods of storing your digital photos:
On your computer
On an external device such as an external hard drive
On the Cloud (internet based storage) HIGHLY RECOMMENDED
Here’s why…
If something happens to your primary digital photo storage, (i.e. your computer crashes) then all of those precious photos will be backed up and secured using the other methods.
While your computer and even an external hard drive are good photo storage options, I highly recommend that you consider using a cloud based service as a digital photo storage solution. Cloud based services are increasingly popular and there are so many options to chose from. Companies that offer cloud storage will allow you to store tons of digital photos and media, sometimes for a fee, and you can access your media at anytime and on any device (i.e. computer, tablet, smart phone). Some services allow you to share your photos using Facebook, Instagram, and Twitter, while others offer products like digital photo books and scrapbooks. Here are just a few services to choose from – there are tons more!
Once you have your photos securely backed up on the cloud, you can have the peace of mind knowing that if something should happen to your other devices, you will easily be able to retrieve them using an internet based storage solution.
STEP FIVE: Print Your Photos and Repeat the Process
Now that you have organized your photos, it’s time to print them! I recommend selecting a set of photos to print as a batch. You can opt to print your photos at home or use one of several photo printing services. My favorites are:
Make it a habit of printing your photos on a weekly or monthly basis. Also, don’t forget to take advantage of photo printing sales! Walgreens and CVS often offer photo printing specials which makes batch print super affordable!
Once you have finished organizing your first set of photos, its time to repeat the process! Pick another set of photos and start the process all over again! Remember, photo organization takes time so don’t feel that you have to rush through it. Set a realistic goal and be consistent. Before long, you will have a library of organized photos ready to be printed, placed in photos albums, or used on a scrapbook layout.
Welcome back to the third and final week of the Victoria Marie Spring Clean Challenge! This week we are talking about photo organization. I truly believe that organizing photos, whether print or digital, can be an easy process. All you need is a simple system and a bit of dedication to see this project through.
Now, I know what some of you are probably thinking: “Victoria, I have a million photos! I can’t possibly organize all of those photos in a week!”
Well great…you don’t have to!
This week were are only going to focus on one set of photos at time. So, your challenge is to pick a set of photos (past or current) to organize this week. You may elect to organize and purge photos on your devices (i.e. smart phones, tablets) or dig into a box of photos that is collecting dust under your bed! Just pick a starting point and go for it! The feeling of organizing one set of photos will build your momentum to attack another set of photos, hopefully in the near future!
Here’s the plan!
Like we did in Week 1 and Week 2, you are going to establish your organization and purge criteria. Remember, this is unique to YOU so do what you feel is comfortable. Identify a set of photos to organize. NOTE: Be realistic! If you have 10 boxes of photos from your childhood, organizing and purging those photos will more than likely take more than a week! Pick one box then go from there.
FIRST STEP: After you have selected the photos you wish to organize, go through each photo (print or digital) and make a decision for our photos: KEEP, SCRAPBOOK or TOSS/GIVEAWAY.
KEEP: Select ONLY the photos you really want to keep. Put these photos in a folder (physical or digital) for later retrieval. The photos that you decide to keep will need a “home” – printed and placed in albums, remain on your computer, or put in cold storage (i.e.photo boxes).
SCRAPBOOK: From the photos you have designated as “keep”, select the photos that you wish to scrapbook. These photos should represent a story that you want to tell – select the very best photos for this task! Put these photos in a separate folder (physical or digital).
TOSS: As you are sorting your photos, set aside the photos that are duplicates, damaged/fuzzy photos, or simply photos that you do not want to keep. NOTE: Special consideration should be given to older/vintage photos that cannot be replaced or reprinted. You might opt to keep those photos or give them away to someone in your family who might want them.
GIVEAWAY: Once you have sorted through all of your photos and have selected the photos you want to keep, scrapbook or toss, make another folder for the photos you wish to giveaway to family members or friends. Consider making small photo albums for these individuals with your extra photos! Or keep a few around for future projects (i.e. kid’s school projects).
SECOND STEP: At this point, you will need to decided how you want to organize your photos – by date, theme, person, etc. I personally like to sort my photos by year and month. Set up a system that works well for you!
THIRD STEP: Establish a home for your photos! For print photos this could be a photo album, a photo safe box, or in your scrapbook album. For digital photos, be sure to establish at least two (2) places to store your photos – on a device such as an external hard drive and using a Cloud based service like Google Photo, Dropbox, or iCloud. More information will be provide in this week’s YouTube video. Of course, be sure to print your most favorite digital photos to have on hand for scrapbooking or to place your photo albums.
Once you have completed sorting, organizing, and purging your first set of photos, repeat the process! Depending on the number of photos you have, this process may take you a few weeks or even a few months to complete. Be patient and work with one set of photos at a time! You can totally do this!
In order to be eligible to win the prize, participants will need to respond to at least one (1) challenge prompt and post a picture on the designated post for that challenge prompt on the Victoria Marie Facebook Group. Winners will be selected by Random.org.
A winner will be chosen and announced on Monday, March 27, 2017.
-Layering Like a Boss 2 – Impactful Embellishing
-Layering Like a Boss 1
-Layering Like a Boss Bundle
-Make the Kit – A Mini Course
-A Scrapbooker’s Guide to Mixed Media
-The Holiday Project – 12 Stories 1 Album
Hey friends! Welcome to Week 2 of the Victoria Marie Spring Clean Challenge! I am so excited that many of you have been playing along with this challenge and are enjoying the organization process.
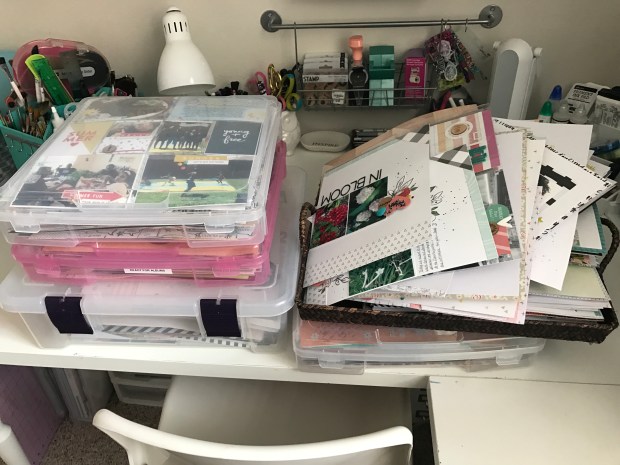
This week we are going to focus on those wayward scrapbook layouts that seem to never make it into our scrapbook albums. This of course can be a very large undertaking (depending on how many layouts you have) but it is certainly doable!
Honestly, I admire those who are diligent with layout organization. 🙂
Let’s get started by establishing layout organization and purge criteria. I want to underscore that the systems you create for yourself should be individual and unique to your personal organization style. Likewise, be open to the fact that your system may change as you evolve as a scrapper.
TOOLS:
Before you begin this process, you will need to grab a few things:
Your layouts…of course!
Containers for your layouts
Albums and page protectors
Post-It Notes and a pen
Adhesive of your choice (to repair layouts if needed)
A nice clean space such as your desk or floor to spread out and work!
ESTABLISHING YOUR ORGANIZATION/PURGE CRITERIA
Before you get started, take a moment to establish your organization/purge criteria. In other words, decide if you want to organize your layouts and albums in chronological order, by theme, person, etc.
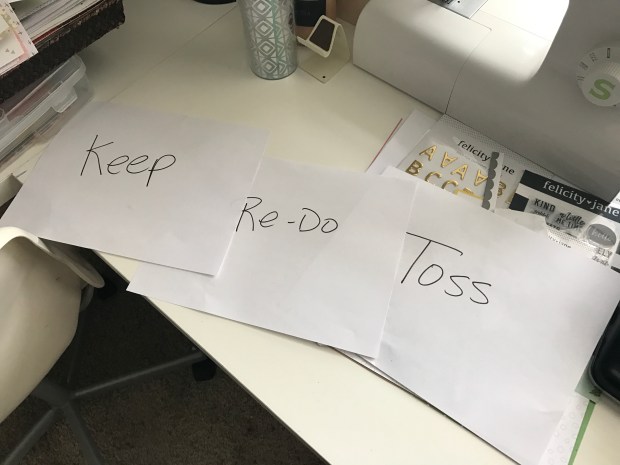
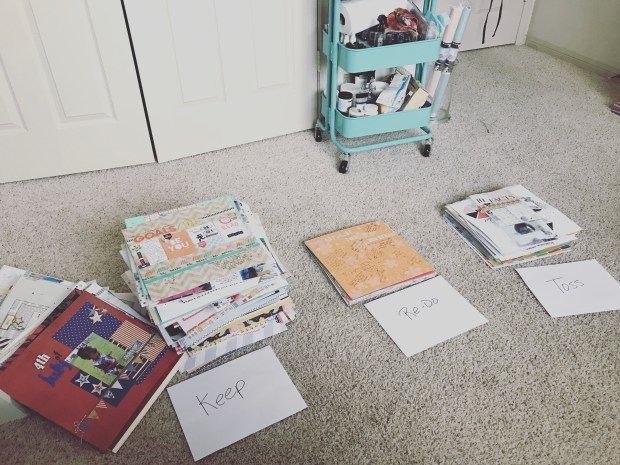
Next, begin by creating 3 main categories for your layouts: KEEP, REDO, and TOSS.
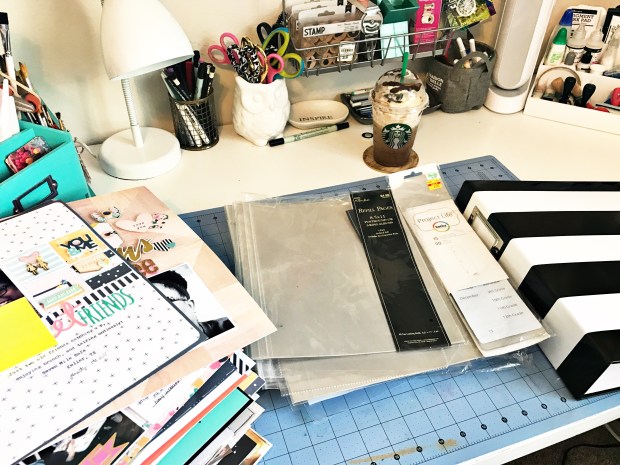
KEEP: Sort through the stack of layouts that you want to keep. Assign each layout a home based upon your organization criteria. I found it useful to make labels using Post-It notes to further categorize my layouts. For example, all of the layouts pertaining to my daughter went into one stack, sorted by date.
While going through this process, repair any layouts as needed (i.e. missing letters, fallen stickers). I discovered that some of my titles and embellishments were starting to come off. I simply reinforced those elements using Tombo Mono Aqua Adhesive Glue. When you are ready, slip your layouts into page protectors and place them in their assigned album. Don’t forget to label your album!
REDO: Set aside layouts that you want to redo. I recommend placing these layouts in a separate container and storing them by your workspace. That way you can easily reach for these layouts when you are looking for a project to work on.
TOSS: If you have identified a few layouts that you no longer want, its perfectly okay to toss them. Yep, you read that right! More on this topic later. Before you toss a layout, see if there is anything on the layout that can be salvaged (i.e. embellishments, ephemera, title). Also, be sure to safely remove the photo from your layout if you wish to keep it. Of course, you may opt to throw the entire layout away…that is totally up to you. If you are having second thoughts about tossing a layout, consider giving your unwanted layouts away to a friend or family member.
Goodbye!
Somethings to keep in mind:
Create a Unique Organization/Purge System: Every scrapbooker is different and will make organization and purge decisions based on his or her level of comfort. Some scrapbookers desire to keep and maintain all of their layouts while others opt to let some go and only keep the layouts they deem “really special”. Either way, you can’t go wrong. Do what feels comfortable and natural to you.
Don’t be afraid to change your process: As you evolve as a scrapbooker, the way you organize your layouts may change. Remain open to this and make adjustment as you see fit.
Pace Yourself: Remember, this is not a sprint! If you have a lot of layouts, start with a small stack and go from there. You might find that it will take you longer than a week to organize and sort your layouts.
It’s Okay to Toss a Layout: Yes, I assure you it is! If there is a layout that you do not like or if it doesn’t serve a purpose in your storytelling journey anymore, consider letting it go. Now, I recognize that scrapbookers have varied opinions about tossing completed layouts so I will come back to this topic later. 🙂
Okay, you are all set to begin your deep layout organization and purge! Take your time and enjoy the process. I will post of video of my process later this week!
If you are playing along, be sure to post a picture of your before and after on the designated post on the Victoria Marie Facebook Group Page! You could be entered to win a Mystery Scrapbook Organization Prize! A winner will be selected on March 27th!
Have you ever taken a picture and thought, “OMG, I have to tell this story!” This photo does it for me!
The Sunday hair dressing ritual is a time honored tradition for so many young girls and moms. This is a time for washing, deep conditioning, and styling – typically done on a Sunday evening in preparation for the week. I remember my mother moisturizing my scalp and braiding my hair – a style that would hold up without much fuss. She was a busy single mother so styling my hair everyday would take up much need time during the week.
My mom is what I call a “kitchen sink stylist”. I remember her telling me to put my head in the kitchen sink as she washed and conditioned my hair. At the time I hated this process because the water would run into my eyes, ears and nose! “Mommy, I drowning!” I would yell. “Girl, you are NOT drowning! Now hush and let me do this!” she would yell in reply.
Old school mamas don’t play!
After this kitchen sink treatment, mom would put on primetime TV…usually Dallas, Falcon Crest, or Dynasty (my love for TV dramas is strong). While she combed, parted and plaited, we watched the Ewing family shenanigans unfold (love me some J.R. Ewing)!
This was our ritual…every Sunday night.
Now I am a mom of a spritely little girl and I have carried on the same ritual (minus the hair braiding…I am not a good hair braider). Each Sunday I wash, condition, and style my little girl’s hair. We catch up on our favorite shows on Netflix – usually Project Runway (my daughter’s favorite) and I style her hair. Instead of the kitchen sink, I wash my daughter’s hair while she takes a bath. Sadly, she is learning to wash her own hair – this signals a slight change to our weekly ritual. (Sniff, sniff…big girl status.) 😦
There are just some stories that are worth telling and often, upon first inspection, these stories may seem ordinarily mundane. But the stories of our routine rituals are important to the fabric of our storytelling and should be included in our memory albums.
For this layout I used the March 2017 Jane Kit by Felicity Jane. For the title, I used an exclusive Felicity Jane cut file called “Live in the Moment” – this cut file is free on the Felicity Jane website. The layers and clusters are mounted on a piece of gray cardstock. To add a bit of interest, I cut a triangle piece from one of the pattern papers from the kit to serve as an anchor for my photo and embellishments. To this I added flowers, a tab, and labels from the exclusive cut apart sticker sheet.
Clean, simple, and easy.
Head on over to the Victoria Marie YouTube channel and check out the process video for this layout! And remember…our everyday stories deserve a space in our memory keeping journey! Be well!
Welcome to week 1 of the Victoria Marie Spring Clean Challenge! This week we are focusing on one (1) area of our scrappy spaces. Yep, you read that right…just ONE area! The purpose of this week’s challenge is to jump-start your scrappy space organization.
And to help you, I have created a Creative Space Organization Planner! Use this planner to sketch out your organization plan and to make note of your action steps and supplies needed to get the task done.
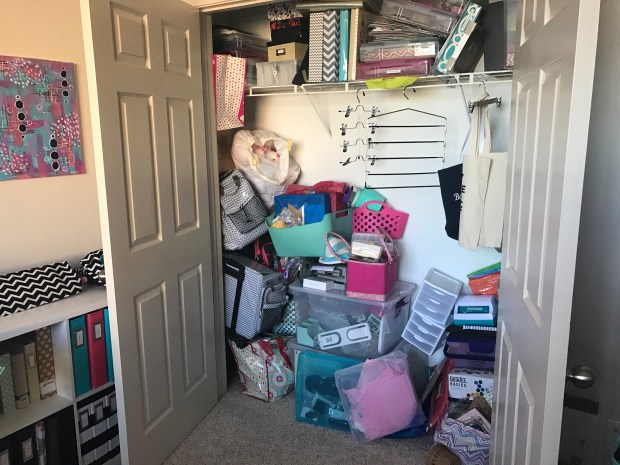
This week I am tackling my scrapbook room closet. Here it is in all of its glory:
Yep, I know. 😦
Sadly, I have put off organizing this closet for several months now. I am typically a very organized person but I cannot stand to look at this closet anymore. But before we get started, we need a plan of action!
PLAN OF ACTION
Identify one area in your scrappy space that needs to be purged and/or organized. Perhaps you need to sort and organize your stamp collection, paper packs, or embellishments. Select a zone that you can tackle and complete THIS WEEK. The point is not to do a major overhaul of your space…we are only focusing on one area this week.
Using the Creative Space Organization Planner, quickly create a simple plan to organize your identified zone. Jot down your action steps, supplies needed, and make a sketch of what you want your zone to look like.
Get to work! Once your plan is set, it’s time to get to work. Begin by clearing out your zone (i.e. storage bin, closet, drawer, corner) and sorting through your stash. Be sure to sort the items into three categories: KEEP, DONATE, and TOSS. As you are going through this process, you might want to have extra boxes or bags ready for the items you want to donate or toss.
Based on the items you want to keep, you will need to decide if you need additional storage options such as bins or storage boxes. Make a note of this in the “Supplies Needed” section of your planner PDF.
Once you are finished, immediately take the items you want to toss to the trash. Next, place the items you want to donate by your front door or place them in your car. That way you will not forget to take those items to your local donation center.
At this point, all you should have left is the items you want to keep. If you need to purchase organization bins or other supplies, set some time aside to do that this week. Otherwise, try to use what you currently have on hand to organize your items – old storage boxes and bins, desk organizers, cube systems all work well!
Organize Your Zone – Now you are ready to get your zone in order by organizing your items. If you have one, pull out your label maker or create labels using cardstock and a marker…you don’t need anything fancy!
Once you are done, identify another zone that you can tackle at a future date. Keep the momentum going! Before you know it, you will have a super organized scrappy space that you will be proud of!
Be sure to take a picture of the space or zone that you organized this week and post it to the designated post on the Victoria Marie Facebook Group! Your name will be entered to win a Mystery Scrappy Organization Prize Pack and a 20% off discount toward a Victoria Marie Online Class!
Are you ready to finally commit and organize at least one aspect of your scrappy life? Do you need a challenge to motivate you? Then you should give the Victoria Marie 2017 Spring Clean Challenge a try!
Hot Mess Alert! My Scrappy Closet – I will tackle this next week!
The Victoria Marie Spring Clean Challenge is designed to get you motivated to tackle one of three trouble spots that scrappers often struggle with (1) craft room/space organization, (2) layout organization, and (3) photo organization.
The VM Spring Clean Challenge is a 3-week challenge that will begin on March 6th until March 26th. Along the way I will provide tips and tools to assist you in your organization efforts. Toward the end of this challenge, you will have the chance to win a Mystery Scrappy Organization Pack and a coupon for 20% off a Victoria Marie Online Class!
WEEKLY LINEUP
March 6th to March 12th: Scrappy Space Organization– During this week we are going to focus on identifying ONE area in our scrappy spaces to organize. This is the perfect time to FINALLY organize those trouble spots that have been staring you in the face for a long time! Ideas include: paper storage, embellishment organization, sorting through old tools, etc. Simply focus on one area to complete this week and get it done!
March 13th to March 19th: Layout Organization – It is finally time to tackle those stacks of layouts that have been hanging around your scrap space (or closet). During this week we are going to purge, toss, or re-do (set aside to re-do) our completed layouts. You will be provided with awesome tips that will help you through this process in addition to ideas that will assist you in determining which layouts to keep, toss or re-do.
March 20th to March 26th: Photo Organization – During this week we are going to tackle photo organization! Don’t panic…I am not suggesting that you spend an entire week organizing ALL of your photos! However, we will spend time focusing on just a few sets of photos to organize, print, or toss. You will be provided with tools that will help you manage your photo organization process.
Be sure to check the Victoria Marie Blog and YouTube Channel each week as we work through this challenge! I will have fun videos and FREE tools to keep you motivated and inspired!
In order to be eligible to win the prize, participants will need to respond to at least one (1) challenge prompt and post a picture on the designated post for that challenge prompt on the Victoria Marie Facebook Group. Winners will be selected by Random.org.
A winner will be chosen and announced on Monday, March 27, 2017.
Participants have until March 26, 2017 at 12:00 CST to play along!
ROOM TOUR
To get us started, here’s a look at my scrappy studio on the Victoria Marie YouTube Channel! I hope you play along with this fun challenge! See you next week!!!