Examples of Materials Include: Wood veneer, cork, puffy stickers, chipboard, glitter elements, twine, jute, acrylic, leatherette elements, clips, brads, and much more! Use what you have in your stash to create fun scrapbook projects of your choice!
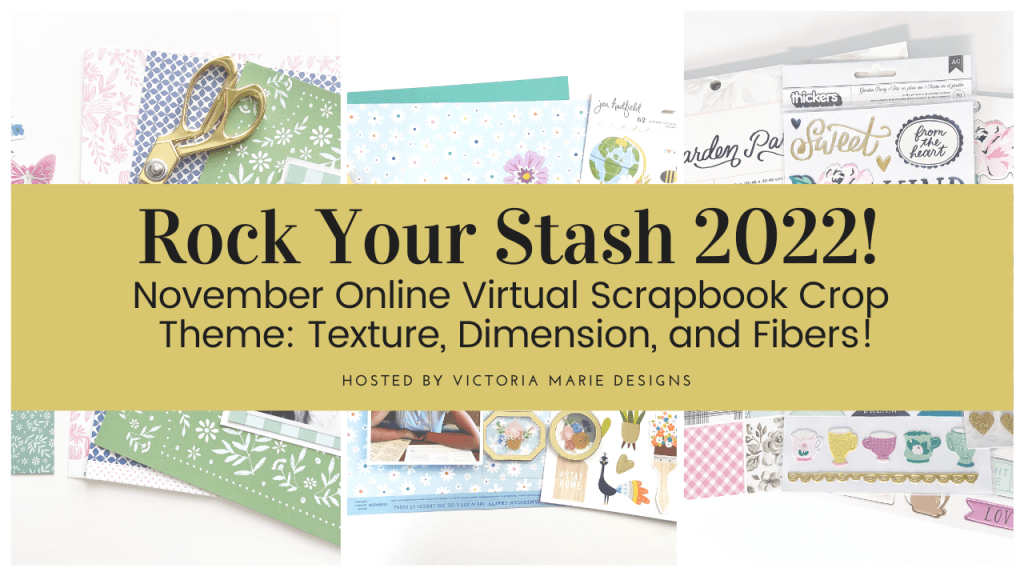
Event Date: November 18-20, 2022
The November 2022 Online Virtual Crop Includes:
Fun Scrapbook Challenges based on the crop theme!
Super Cool Prizes!
Awesome Giveaways!
5 LiveZoom Scrap and Chat Sessions
One 45-minute Mini Workshop: Playing with Texture and Dimension!
The crop is hosted in a private Facebook Group!
Only $9.99 USD!
And the best part? You will have 3 WEEKS to finish the challenges in order to be eligible for prizes! So there is NO RUSH for you to finish the challenges during the crop weekend!
Schedule of Events: To view a Schedule of Events for this crop, click HERE! Challenge descriptions are available upon registration.
REGISTER TODAY! To learn more and to register for this fun event, click HERE!
Registration will end on Saturday, November 19th at 11:30 pm CST. I hope to see you there!
In 2021, I started an October Daily album. After being inspired by other scrapbook designers who create the most stunning October Daily albums, I wanted to dive in and give it a try. October Daily is like December Daily (by Ali Edwards), however, the idea is to document stories about your everyday life during the fall and Halloween season. I’ve always created traditional 12×12 inch layouts to document my fall memories. But, after many years of scrapbooking, I welcome the opportunity to scrapbook my autumn stories in a different format.
So, with good intentions, I started an October Daily album last fall. I documented a total of four stories, then I abandoned the project! As it turns out, my plate was filled to the brim with projects and deadlines, so my October Daily album got pushed to the side.
However, this year I decided to continue this project but with a different mindset…my October Daily project will be a perpetual album! I am giving myself the freedom to add to this project whenever I want throughout the fall season over multiple years.
Once an album is filled, I’ll just start a new one. This approach offers a ton of flexibility and allows me to focus on the spirit of the project versus worrying about an arbitrary self-imposed deadline to “finish” this album.
Today on the Victoria Marie YouTube Channel, I’m continuing my October Daily project by creating two new spreads (story #5 and #6) along with a quick look at the layouts I completed before I stopped working on this project in 2021. Be sure to click on the following video to see these pages come together! Also, photos of today’s projects are posted below.
Citrus Twist Life Crafted Album: To learn more about the album featured in today’s video, click HERE.
For this project, I’m working in a travelers notebook style format (4.25 x 8.25 inches). I find this size to be perfect for everyday and theme-based mini albums.
My goal for this project is to keep my pages simple and clean, with a focus on documenting my everyday stories throughout the month of October.
I love that there are so many options and variations of the October Daily project! Some people create mini albums, while others opt for notebook style projects, even planner spreads! You can truly make this project your own.
I’m so excited to share more of layouts from my October Daily album in the coming weeks! So far, I am having a blast documenting my fall adventures and using a good amount of my fall themed scrapbooking goodies!
There are only 3 DAYS left to save 50% off selected Victoria Marie Designs Online Classes!
New online scrapbooking classes and workshops are coming to the Victoria Marie Designs Online Classroom, and to make room of these new learning opportunities, I am retiring 9 of my online scrapbooking classes!
Until October 8th, save 50% off selected Victoria Marie Designs Online Classes! Use code RETIRED at checkout! Grab these courses while they are still available! (*Some exclusions apply.)
The following classes are included in this offer (see below). All Victoria Marie Designs Online Classes are self-paced and are available 24/7 in the Victoria Marie Designs Online Classroom, powered by Thinkific. Each class includes instructional videos and full-color PDF workbooks. Also, you can start, resume, and stop a class at your leisure.
Want ALL of the Retired Classes? Grab the Retired Classes Bundle and Save!
Do you want all 9 of these retired courses? Check out the Victoria Marie Designs Retired Classes Bundle which includes all of the classes listed above for one amazing price! The value of this bundle is $353.00 USD. But, for a limited time, you can purchase this bundle for only $150.00 USD! NO COUPON CODE NEEDED! This bundle is marked down and priced to sell!
Head to the Victoria Marie Designs Online Classroom TODAY and grab these courses before they are gone! All sales are final – no refunds.
Purchase a Class!
To purchase a retired Victoria Marie Designs Online Class, click HERE!
This offer ends on October 8, 2022! Stay tuned for new classes and workshops to come!
_________________________
*Exclusions: This offer does not apply to the following classes: Project DONE: A Year-Long Scrapbooking Journey, YouTube Master Class for Online Creatives.
Registration is now open for the October 2022 Online Virtual Crop: STICKER FUN! During this crop, we are going to focus on creating scrapbook projects (any format) using our STICKER stash!
Event Date: October 14-16, 2022
October 2022 Theme – Sticker Fun!
All of the scrapbook challenges for this crop are based on using your stickers from your stash (any kind) to create scrapbook projects. Die cut, cardstock, chipboard, acetate, wood veneer stickers…anything goes!
The October 2022 online virtual crop includes:
Fun Scrapbook Challenges based on using stickers of any kind from your stash!
Super Cool Prizes!
Fun Giveaways!
5 LiveZoom Scrap and Chat Sessions
One 45-minute Mini Workshop: Large Sticker Inspiration!
The crop is hosted in a private Facebook Group!
Only $9.99 USD!
And the best part? You will have 3 WEEKS to finish the challenges in order to be eligible for prizes! So there is NO RUSH for you to finish the challenges during the crop weekend!
Schedule of Events: To view a Schedule of Events for this crop, click HERE! Challenge descriptions are available upon registration.
REGISTER TODAY! To learn more and to register for this fun event, click HERE!
Registration will end on Saturday, October 15th at 11:30 pm CST. I hope to see you there!
Well, guess what? It’s now available for INSTANT DIGITAL DOWNLOAD after purchase!
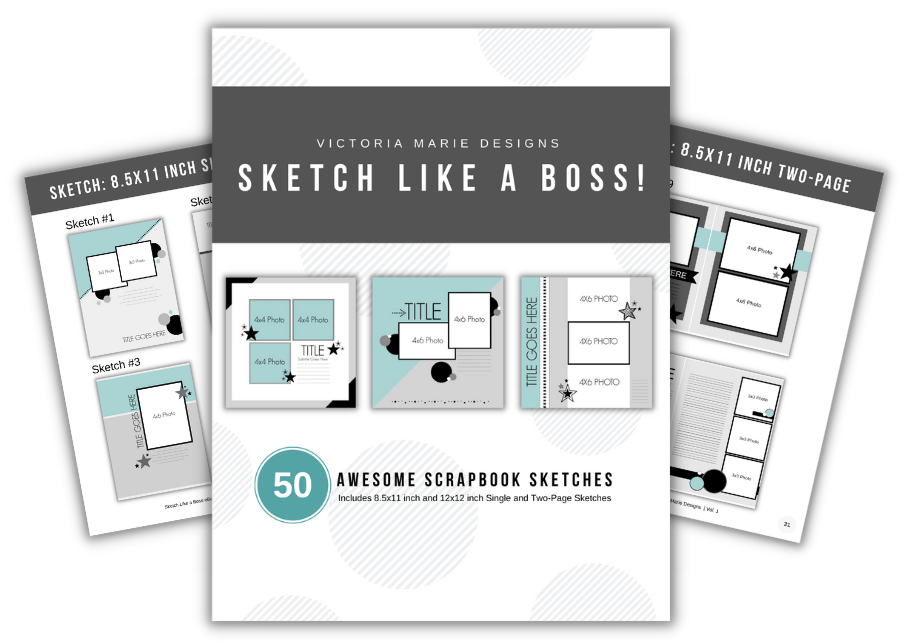
The Sketch Like a Boss eBook features 50 scrapbook sketches to include 8.5 x11 inch and 12×12 inch single and double page sketches. All of the sketches are easy to use and flexible based on your scrapbooking style! This full color digital ebook also includes tips and recommendations for using scrapbook sketches and Bonus Project Inspiration layouts using some of the sketches in this ebook.
Special Note: If you are currently enrolled in the Sketch Like a Boss Online Class, you do not need to purchase this ebook as it is available in your course materials!
This ebook is available as a digital PDF digital download – you will be able to instantly access the ebook upon purchase! You are welcome to use the ebook on your smart device, desktop, or print the ebook for your reference. NOTE: Printpermission is provided if you opt to print the Sketch Like a Boss eBook at you preferred print shop.
PURCHASE THE SKETCH LIKE A BOSS eBOOK FOR ONLY $12.99 USD!
The Sketch Like a Boss eBook is now available for $12.99 USD. Upon purchasing the ebook, you will get access to a zip file that contains the ebook. Just open the zip file to access the Sketch Like a Boss eBook file. You are granted 2 downloads of the ebook file, so be sure to save a copy of the ebook for future reference.
Shop Today! To purchase the Sketch Like a Boss eBook, click HERE or click eBookand Tools at the top of the screen.
PREVIEW THE SKETCH LIKE A BOSS eBOOK! Below is a quick preview of the Sketch Like a Boss eBook. Click on the photo to expand image.
This eBook contains:
8.5×11 and 12×12 inch Single Page Scrapbook Sketches (general design, no measurements)
8.5×11 and 12×12 inch Two-Page Scrapbook Sketches (general design, no measurements)
A total of 50 scrapbook sketches!
Easy to use tips and recommendations for using scrapbook sketches!
Bonus Scrapbook Project Inspiration using some of the sketches from the eBook!
Available as an INSTANT DIGITAL DOWNLOAD after purchase! (Not a physical product.)
Shop Today! To purchase the Sketch Like a Boss eBook, click HERE or click eBookand Tools at the top of the screen.
Share Your Projects! Also, if you use any of the sketches from the Sketch Like a Boss eBook, be sure to tag Victoria Marie Designs on Instagram @victoriamariescraps! I can’t wait to see what you create! Thanks for your support and enjoy the Sketch Like a Boss eBook!
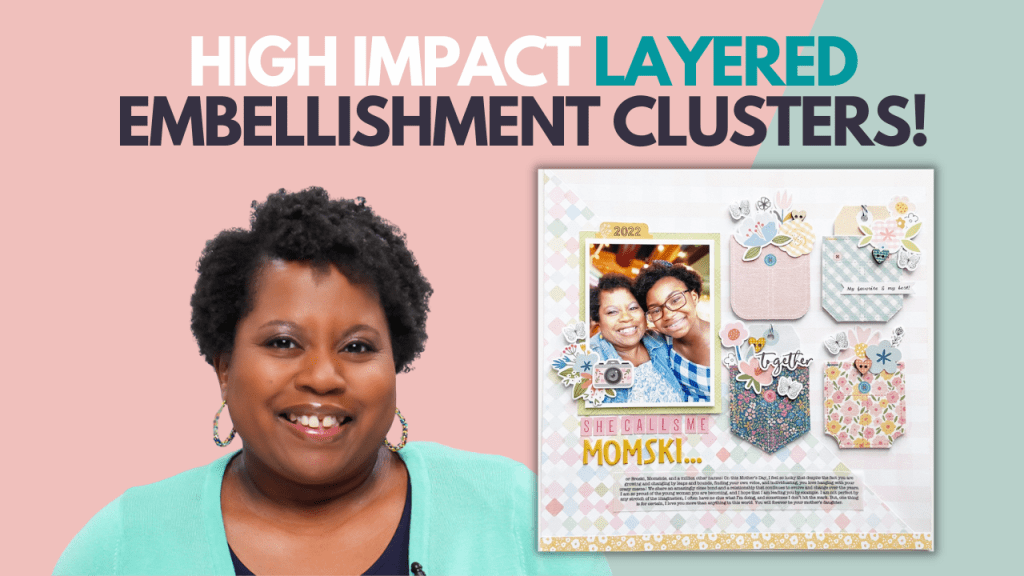
This week, I’m continuing my Layering Series on the Victoria Marie YouTube Channel with a look at design concepts and product recommendations for creating high impact layered embellishment clusters. If you love the look of layered clusters on a scrapbook layout but are not sure what type of products to use, no worries, I’ve got you covered!
High impact layered embellishment clusters contain elements that have a variety of textures, colors, and sizes. Most scrapbookers use cardstock die cuts to create embellishments clusters (and there is nothing wrong with that). However, to take your layered embellishment clusters to the next level, consider using a variety of elements such as wood veneer, acrylic, cork, enamel dots, or puffy elements when creating layered clusters.
In today’s video, I share a few design concepts that can be used to create high impact layered embellishments clusters. These concepts include:
Texture
Shape
Color
Size
Scale
Together, these design concepts can help inform the products you select for your scrapbook projects and the overall design of your layered composition. To learn more, click on the video below!
Here’s an example of these concepts at play!
This 12×12 inch layout features a variety of elements of different sizes, shapes, textures, and scale. The top cluster houses a large title which is flanked by mid-size and smaller elements. This concept is repeated for the other layered clusters. To add interest to the layered clusters, I used chipboard elements, cardstock die cuts, enamel dots, tags, labels, and stickers. Together, all of these elements help to create high impact layered embellishment clusters.
Here are a few more layouts where I used these design concepts to create layered embellishments clusters!
This layout features cardstock frames, chipboard floral elements, a puffy sticker banner, chipboard hearts, and enamel dots.
This grid design layout features lots of wood veneer, cardstock die cuts, and chipboard elements to create small layered clusters throughout the composition. All of the elements range in size, shape, scale, and texture.
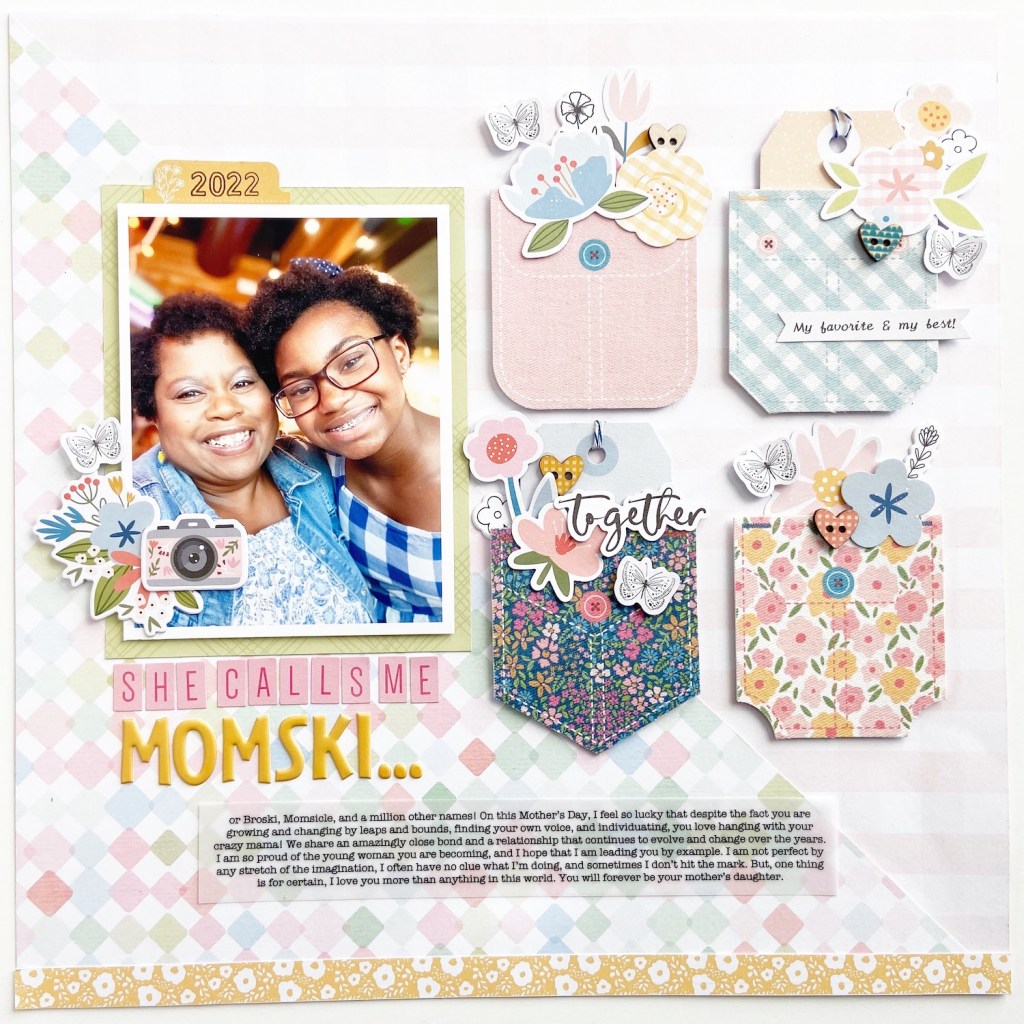
And lastly, this layout features fabric pockets that are layered with cardstock die cuts, chipboard elements, fabric butterflies, and wood veneer heart buttons. The varied size, texture, and scale of these elements creates a stunning layered scrapbook page!
The next time you create layered embellishment clusters on a scrapbook project, be sure to consider these design concepts and product recommendations. If you are inspired to test out these concepts, feel free share what you make with the Victoria Marie Facebook Group Community!
P.S. If you missed the first video in this series, Layout Study – Why This Works, click HERE!
The Sketch Like a Boss eBook features 50 scrapbook sketches to include 8.5 x11 inch and 12×12 inch single and double page sketches. All of the sketches are easy to use and flexible based on your scrapbooking style! This full color digital ebook also includes tips and recommendations for using scrapbook sketches and Bonus Project Inspiration layouts using some of the sketches in this ebook.
Special Note: If you are currently enrolled in the Sketch Like a Boss Online Class, you do not need to purchase this ebook as it is available in your course materials!
This ebook is available as a digital PDF download – you will be able to instantly access the ebook upon purchase! You are welcome to use the ebook on your smart device, desktop, or print the ebook for you reference. A link to purchase this ebook will be available on September 30th on the Victoria Marie Blog so stay tuned!
GRAB A FREEBIE!
Meanwhile, enjoy the FREE Sketch Like a Boss Creative Jumpstart Preview Sketches PDF! This download contains 4 scrapbook sketches from the Sketch Like a Boss eBook that you can start using today! To grab this freebie, click HERE!
A couple of week’s ago, I challenged myself to use 1 paper pad to create 10 scrapbook layouts. And to make things interesting, I constructed all 10 layouts during my Wednesday YouTube Livestream!
You read that right…ALL 10 LAYOUTS!
This all began when I was purging and organizing my scrapbook studio several months ago. During this process, I let go of several paper pads but kept a small stack (just in case). I told myself that I could keep my remaining paper pads if I used them on a big scrapbook project sometime in the near future.
Recently, while going through my scrapbook supplies, I came across the Arcadia Paper Pad by DCWV. I love the color palette of this paper pad and immediately knew that I had to use it. I also wanted to inspire other scrappers to use paper pads from their stash to create stunning scrapbook projects.
So, my 1 Paper Pad + 10 Layout Challenge was born!
My process was simple:
Deconstruct the Arcadia paper pad to create 10 scrapbook kits (3-4 pattern papers per kit).
Add embellishments from my stash to round out each kit.
Use the kits to create 10 layouts!
To see the prep process of this challenge, click HERE! I completed the entire process live on the Victoria Marie YouTube Channel.
The following week, I created all 10 layouts during my weekly livestream. In fact, it took me 3 hours to construct all 10 layouts! Not too shabby! To see the construction of all 10 layouts, click HERE!
After completing this challenge, I had a few scraps of paper left over from the Arcadia paper pad. So, I decided to make a few extra projects to include tags, cards, and more. And of course, I created all of these projects live on my YouTube Channel…click HERE to check it out!
Overall, I absolutely LOVED this entire experience – from deconstructing the Arcadia paper pad to making a bunch of layouts. But, what I love the most is that several members of our scrappy community were inspired to do this challenge as well! I love seeing all of your projects on Instagram and Facebook!
So, the questions remains…will I do this challenge again? You bet! In fact, I’m planning another challenge for October 2022 so stay tuned for more.
Meanwhile, the following are photos of all 10 layouts plus the bonus projects I created using the Arcadia paper pad. If you were inspired to create scrapbook projects based on this series, be sure to tag me on Instagram @victoriamariescraps or on Facebook!
The Projects
Layout #1: This Story – 12×12 inch Single Page
Layout #2: She is Lost In a Book – 12×12 inch Single Page
Layout #3: Lovely Day – 12×12 inch Single Page
Layout #4: You Make Today Better – 8.5×11 inch Single Page
Layout #5: Crafty Merch – 12×12 inch Single Page
Layout #6: Mom Life – 12×12 inch Single Page
Layout #7: What a Crazy Kid – 8.5×11 inch Single Page
Layout #8: Love – 12×12 inch Single Page
Layout #9: Everyday Calvins – 12×12 inch Single Page
Layout #10: Sunshine Girl – 12×12 inch Single Page
Bonus Projects Using Scraps from the Arcadia Paper Pad
Projects: Frames, Tabs, Pockets, Embellishments
Projects: Cards (US A2 4.25 x 5.5 inch)
Projects: Tags
Projects: Pre-Made Scrapbook Backgrounds (12×12 inch Single Page)
NOTE: An affiliate link was provided in this post. This link is free for you to use. Victoria Marie Designs receives a small commission anytime affiliate links are used for purchases. Thanks for your support!
Today on the Victoria Marie YouTube Channel, I’m kicking off my Scrapbook Layering Series! In this series, I will be addressing some of your questions about scrapbook layering techniques, from creating a balanced composition, recommended products, layering techniques and more!
We will begin this series with a layout study, which is essentially studying a layout and taking note of what makes the layout composition work. A layout study is a great place to start if you struggle with layering or want to refine your layering skills.
Be sure to head over to the Victoria Marie YouTube Channel to check out the first video in this series. Also, the projects featured in today’s video are provided below. If you have any questions, feel free to post them in the comments section of this blog post or in the comments section of this video!
Layout Study – Why This Work
Layout #1: Happy and Gray (8.5×11 inch Layout)
Why This Work: This layout features a torn distressed background composition that adds lots of interest without overwhelming the entire layout. The layered clusters are composed of a variety of elements to include die cuts, fabric butterflies, and wood veneer elements. Additionally, the elements have a different size and scale which helps to create a balanced composition. Lastly, the diagonal positioning of the layered clusters draws the eye directly to the photo.
Layout #2: Journey – Let’s Go (12×12 inch Layout)
Why This Works: This layout features a visual triangle which draws the eye from the top right of the layout, to the center left by the photo, and ending at the bottom right with a small layered cluster. Notice how each cluster has similar elements -die cuts, foam stickers, and enamel dots. This helps to balance the overlook of the layout while adding a bit of cohesion. Also, each cluster is a different size, from the mid-size title cluster to the smaller cluster at the bottom – all working together to balance the total composition of the layout.
Layout #3: Squeeze the Day (12×12 inch Layout)
Why This Works? This is a perfect example of an asymmetrical layered scrapbook composition! The bottom 2/3 of the layout features a dynamic title, flanked by two clusters of embellishments. Most of the interest rests in the lower part of the layout, however, it is balanced by the smaller cluster at the top of the page. Each layered cluster features similar elements – chipboard elements, a butterfly, and flat-back brads. The variety of elements used adds a ton of texture and interest to this layered scrapbook page.
Layout #4: She Calls Me Momski (12×12 inch Layout)
Why This This Works: This layout features a stunning collection of layered fabric pockets that are positioned on the right side of the page, which is complimented by a small layered cluster on the left side of the layout. The positioning and design of these elements draws the eye from the left to the right side of the layout. Each of the four pockets on the right side feature layered die cuts, wood veneer and chipboard elements. The pockets appear to be self-contained but they work together to create a stunning design. To balance the layout, a smaller layered cluster was added to the bottom left of the photo using chipboard and die cut elements.
I hope this layout study gave you a little more insight into the concept of layering. Of course, we are only scratching the surface! We will continue to explore more layering concepts through this series in the coming weeks. Meanwhile, if you have any questions, be sure to post them in the comments section! Stay tuned for more to come!
Today on the Victoria Marie YouTube Channel, we are going to explore a super simple technique that you can do TODAY that will add a subtle touch of texture to your scrapbook layout using a basic shape, cardstock, and a distress tool!
Adding a bit of texture to a scrapbook layout doesn’t have to take away from the composition of the design. For this project, I created a circular element that features textured strips of solid white cardstock. I was going for a subtle monochromatic look with high impact texture for this design.
To begin, I trimmed two circles (7 inches and 7.5 inches) from American Crafts Textured White Cardstock and solid pink cardstock from Felicity Jane using a circle cutter. TIP: You do not need a fancy tool to create circles on your scrapbook layouts! Any circular item can be used to trace a circle for a scrapbook project – a bowl, cup, or a circular container will do the trick!
Next, I trimmed several 1×12 inch strips of solid white textured cardstock and distressed one edge of each strip with a Tim Holtz Distress Tool. Of course, you can use scissors to create distressed edges as well.
To finish this element, I layered strips of the distressed paper on the 7 inch circle and trimmed the excess paper. The 7 inch circle was then adhered to the 7.5 inch pink circle – this provided a bit of framing to the 7 inch circle and allows it to stand out a bit more on the layout. Lastly, the distressed circle element was adhered to the middle of the layout. To complete this project, I added photos, a title, journaling, and embellishing.
I absolutely LOVE how this design came out! The monochromatic color of the circular element coupled with the high impact texture from the distress strips adds a subtle bit of texture and interest to this project. I highly encourage you to give this simple and quick technique a try!
To see this layout come together, click on the video! Links to available products featured in this video are provided below! Thanks so much for stopping by!